
Correct storage and effective sealing of foods is a major consideration for any food service business; being essential for freshness, food safety, hygiene and in some cases, such as sous vide, safe cooking. With this in mind what’s a vital tool in the arsenal of any serious commercial foodservice operator?
…a vacuum pack machine.
This unassuming piece of equipment sits quietly in the background letting the heavy duty units hog the limelight while discreetly keeping foods fresher for longer, preventing burns that could potentially occur during the freezing process, reducing food waste and even being detrimental for preparation in sous vide cooking. Vacuum pack machines make sealing effective, secure and convenient.
Unfortunately these unlikely heroes are not infallible. As with everything in life, unforeseen circumstances can and will arise, potentially leaving you with portions of ingredients in desperate need of sealing and a vacuum sealer that has given up the ghost. Make sure to never be left high and dry and at risk of blowing food waste levels out of the stratosphere with this simple hack to keep kitchens ticking over until a new vacuum packer arrives.
Luckily, selected equipment in our range of vacuum pack machines is available with a next day delivery option meaning that operations are back up and running to full efficiency in as little time as possible.
While this hack isn’t 100% effective and is in no way recommended as a permanent solution, it will ease the pressure in a crisis and offer a quick fix to the dilemma.
Seal Without a Vacuum Pack Machine
Whether securing solids or locking in liquids, try this simple and effective yet temporary answer to the issue.
You’ll need:
- Zip locking bags with a strong, secure seal
- Large cooking pot or container filled with water
Securing Solids
- Put food in a bag and level out contents as evenly as possible to achieve a uniform depth when the bag is laid flat. This will make it easier and more economical to store ingredients. If planning on thawing or cooking at a later point, this little tip will also help to achieve even, more consistent end results.
- Remove as much air as possible by hand and tightly seal the zip until there’s about an inch left open.
- Carefully introduce the bag to the container of water, holding the bag by the open corner. Slowly and gently continue to lower the bag until the open corner is just above the water line.
-
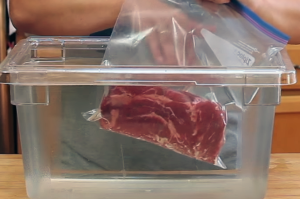
- Seal the open corner securely whilst the bag is still in the water. Remove and dry thoroughly.

Locking In Liquids
- Add liquids to the bag being careful not to overfill. It’s best to leave a couple of inches breathing room at the top.
- Remove as much air as possible by hand, being careful not to suffer any spillages. Securely seal the bag leaving a small gap, about an inch should do it.
- Allow the liquid filled part of the bag to hang over the edge of the counter. Make sure there’s no potential air gap between the counter edge and the top of the liquid.
- Completely flatten the remaining bag laid out on the counter top, removing any excess air before completing the seal.
- Alternatively, if the liquid is suitable for freezing, freeze it first to form a solid and then create a seal as when dealing with other solid ingredients.
Ok, so this method is never going to be as effective or safe as using a bona fide vacuum packing machine however could get kitchens out of a scrape should the unthinkable happen. No need to let that food go to waste, simply get a few zip lock bags and a tub of water … hey presto a temporary vacuum sealer.